
MOSAIC ENGINEERING TECHNICAL ARCHIVE
Historical / DiscontinuedNikon VAF Installation & Removal
Recovered handling instructions for the discontinued VAF-D600 and VAF-D800 removable optical anti-aliasing filters.
BEFORE YOU BEGIN
Read the Complete Procedure First
The D600 and D800 filters used the same general installation and removal method. The photographs below preserve the original procedure.
HANDLING & OPTICAL CARE
Protect the Filter and Camera Interior
Handle by the Edges
Remove the filter from its container and protective wrapping while holding only its corners and edges.
Remove loose dust with a suitable clean-air optical duster.
Use the Supplied Tool
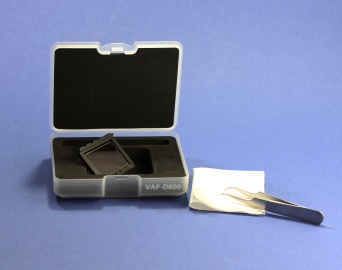
The original kit included pointed tweezers for installation and removal, plus a lint-free optical cloth for cleaning and storage.
Clean Gently
Fingerprints were removed with a small amount of alcohol-based lens cleaner on soft optical cloth.
Avoid vigorous rubbing or dragging abrasive particles across the coated surfaces.
INSTALLATION PROCEDURE
Installing the VAF-D600 or VAF-D800
The photographs below preserve the original D600 procedure. The D800 filter followed the same general installation method.
Inspect the Filter and Tools
Unwrap the filter while holding it by its edges.
Confirm that the pointed tweezers and lint-free cloth are available, and remove any visible loose dust before approaching the camera.
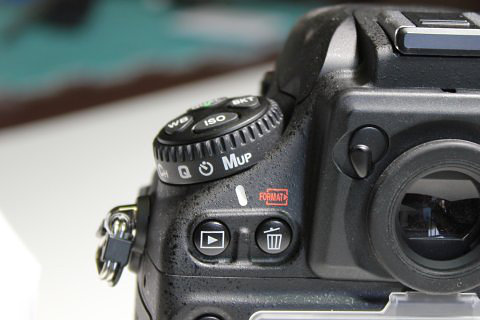
Select Mirror-Up Mode
Set the camera's release-mode dial to Mup.
This allows the reflex mirror to be raised without opening the focal-plane shutter, helping protect the image sensor during installation.
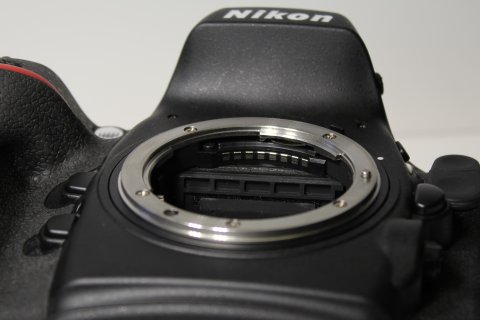
Identify the Five Engagement Points
Remove the lens and press the shutter-release button.
With the mirror raised, locate the five shallow rectangular depressions along the front edge beneath the reflex mirror. The filter's five upper tabs engage these points.
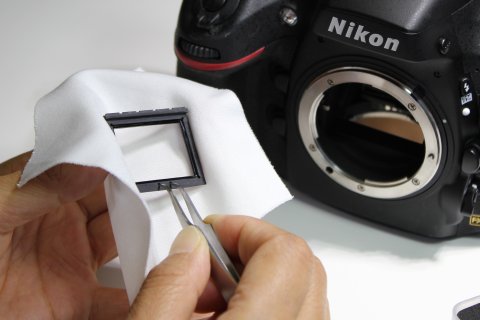
Grip the Filter From the Flat Front Side
Insert the tweezer tips into the two holes at the bottom of the filter.
Approach from the front, flat side, not the rear beveled side.
Confirm that the five small protrusions are at the top.
Hold the Camera Vertically
Orient the camera so its lens opening is vertical.
Maintain this position throughout installation so a dropped object cannot fall directly toward the image sensor.
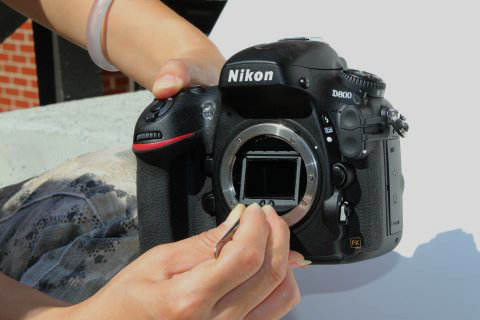
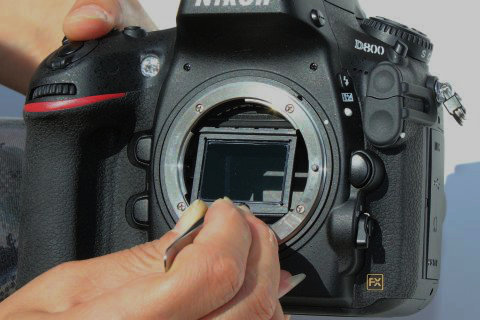
Engage the Top of the Filter
Press the shutter-release button to begin a new mirror-up interval.
Angle the filter into the camera and guide its five upper protrusions into the corresponding depressions beneath the reflex mirror.
Seat the Lower Edge
Gently press the bottom of the filter into the camera so it engages the groove at the base of the mirror cavity.
Correct installation requires very little force.
If the mirror-up interval ends, gently withdraw the filter and allow the mirror to return normally before trying again.
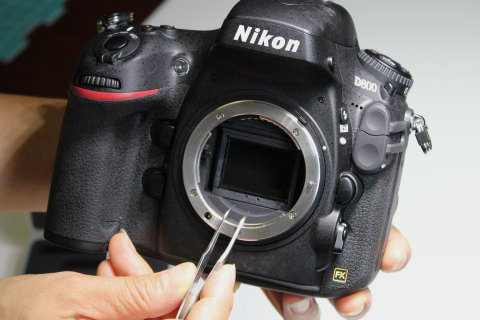
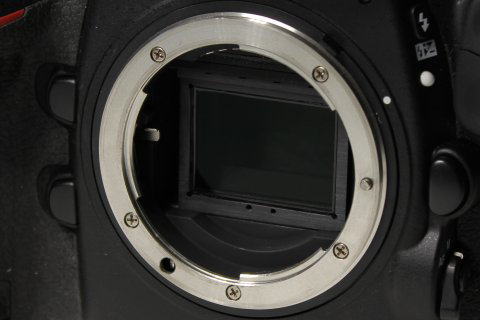
Confirm the Filter Is Flat
When correctly installed, the filter's flat front face sits within the camera body parallel to the lens flange.
Verify the Lower-Edge Engagement
Inspect the lower edge carefully.
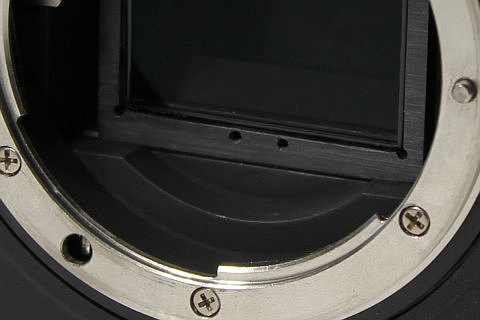
On the original design, it must be fully engaged in the base groove behind the crescent-shaped cutout.
If necessary, apply only gentle pressure to seat it fully before mounting a lens.
LATER HOUSING REVISION
Filters Shipped After Approximately April 2014
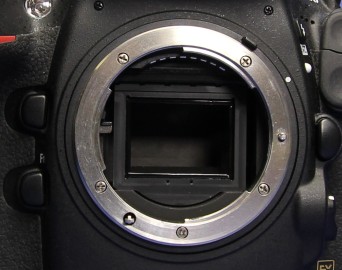
Later VAF-D600 and VAF-D800 filters used a revised mechanical housing.
A crescent-shaped protrusion extended from the bottom of the filter into the corresponding lens-flange cavity.
This version did not snap into place like the earlier design. Two small rubber pads retained it by gentle friction.
REMOVAL PROCEDURE
Removing and Storing the Filter
Removal reverses the installation sequence and uses the same supplied pointed tweezers.
Raise the Mirror and Lift the Filter
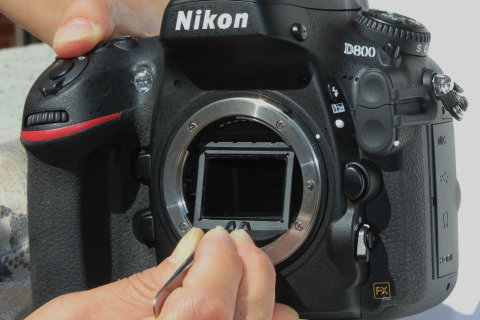
Remove the lens, select Mup, and raise the reflex mirror.
Insert the pointed tweezers into the filter's handling holes, gently lift the lower edge from its retaining groove, disengage the upper tabs, and withdraw the filter from the camera.
If the mirror begins to lower, gently continue withdrawing the filter and allow the mirror to return normally.
Wrap and Store the Filter
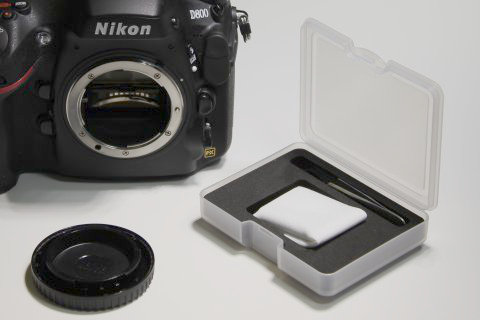
Inspect the optical surfaces without touching them.
Wrap the filter in the supplied lint-free optical cloth and return it to its protective container to keep it free from dust and contamination.
FINAL CHECK
Before Returning the Camera to Use
- Correct VAF-D600 or VAF-D800 filter is matched to the camera
- Five upper engagement points are correctly seated
- Lower edge is correctly retained for the applicable housing design
- Filter face is flat and parallel to the lens flange
- No dust, tools, or loose material remain inside the camera
- Optical surfaces remain clean and free of fingerprints
RELATED HISTORICAL INFORMATION
Continue From the Installation Procedure
Video Anti-Aliasing Filters
Return to the Nikon VAF-D600 and VAF-D800 product history and broader video-filter program.
Back to Product Archive →Technical Q&A
Background on optical anti-aliasing, focus, polarization, camera integration, and historical removable VAF operation.
Explore Technical Q&A →Legacy Products
Browse Mosaic's broader archive of camera filters, imaging systems, and historical optical products.
Browse Legacy Products →LOOKING FOR CURRENT OPTICAL PRODUCTS?
Continue With Mosaic Optoelectronics
This page is retained as part of the Mosaic Engineering historical archive. Current optical anti-aliasing, polarization, crystal-optics, and custom optical inquiries are handled by Mosaic Optoelectronics.